Help Center
Documentation
1. Introduction
millio connects all your bank accounts to your Salesforce system and allows you to fully organize your banking transactions from within your Salesforce environment and access your accounts in a single interface.
The following documentation gives you detailed information about the tool and describes all necessary steps regarding installation and configuration to successfully use millio.
If you need assistance at any point, feel free to contact us by email at support@millio.com and we will help you immediately!
1.1. Features
millio provides the following functionality directly in your own Salesforce environment:
- Overview of all your accounts
- Monitoring incoming and outgoing payments
- Trigger outgoing payments
- Triggering of direct debits
- Reporting and controlling of your bank processes
All functionalities can be (mostly) automated. The millio application and Salesforce-native automation options are seamlessly integrated.
This listing serves as an overview. In the further course we will describe these functions individually and in detail.
1.2. Requirements
millio communicates with the finAPI* interface (note: all terms marked with * are explained in more detail in the glossary) and therefore requires the use of a Salesforce Platform Edition or Salesforce SalesCloud Enterprise Edition. Higher editions of SalesCloud are of course also supported.
1.3. The interface
 X
X
The interface for configuring and using millio is composed entirely of native Salesforce components. You will find the following tabs in the application:
| Tab | Description |
|---|---|
| Home | On the home interface you will find up-to-date dashboards on your account transactions, successful money transfers and direct debits. In addition, the three most important list views are displayed: open, unassignable "Transactions", open "Money Transfers" and open "Direct Debits". |
| Configurations | With the help of a "Configuration" record created during the configuration, you control the basic configuration of the application. |
| Banks | Here you create and manage the connections to your banks. |
| Accounts | Each created bank account has one or more bank accounts. You can find them in the "Accounts" tab. |
| Money Transfers | Outgoing payments tab. You will find here already created outgoing "Money Transfer" payment records and you can assign them to a payment order for transmission to the bank. |
| Direct Debits | Tab for direct debits to be triggered. You can find already created direct debits here and assign them to a payment order for transmission to the bank. |
| Payments | "Payments" are payment orders that can be transmitted to the bank. They contain further information such as the account from which payments or direct debits are to be executed or the specific date of execution. |
| Transactions | Here you will find an overview of all transactions - across bank accounts and complete. You can also see here which transactions could be assigned automatically and which not. |
| Templates | Here you will find order templates and standing orders. Both for "Money Transfers" and "Direct Debits". |
| Results | List of most actions performed in the application with respective result and information about occurred errors. |
This overview serves the better comprehensibility of the following documentation. Details on the use of the individual tabs will be given in detail later.
2. Installation and configuration
To use millio, some preparatory steps are necessary. These include the installation of the tool itself, of course, but also more advanced configurational measures, which we describe in this chapter.
2.1. Installation
millio is installed via the AppExchange.
When you are on the installation page, select "Administrators only". This selection is necessary, otherwise non-authorized users could gain access to sensitive data.
 X
X
Click "Install" and confirm the message "Yes, grant access to these third-party sites". As part of the installation, release must be granted to address different interfaces. In addition to the finAPI interface, communication with millio servers is also required for the smooth operation of the tool. With "Next" the installation is started.
 X
X
 X
X
Once your installation is complete, you will find all the components associated with the package in your org. You can recognize them by the "millio" namespace.
You may see a notification that reads, "This application will take some time to install. You will receive an email when the installation is complete." If it's the first time such a message appears to you, don't worry. Just click "Done." Salesforce will then email you to let you know if the installation was successful.
After the installation is complete, we recommend that you check the installation in the "Packages" section under "Installed Packages" in Salesforce Setup.
 X
X
2.2. Granting of rights of use
The use of the application requires the assignment of certain rights to desired Salesforce users. A basic distinction is made here according to the type of use:
- millio licenses
- Salesforce permission sets*
millio licenses are assigned in the "Installed Packages" section, directly at the millio package listed there. To do this, click the "Manage licenses" button and assign the desired users.
 X
X
Salesforce permission sets are assigned separately. The following types of Salesforce permission sets are basically distinguished in millio:
- millio Admin: for full administrative access to all areas of the application
- millio-User: for user access to account transaction data, payments and direct debits
To assign these permission sets, search for "permission sets"* in the setup.
Search in the list for "millio Admin" and "millio User" and click on the respective set of permissions you want to assign to a user.
Go to "Manage Assignments" and add the desired users by checking the checkbox.
 X
X
IMPORTANT: It is also essential to share the dashboards and reports that come with millio by default. To do this, please go to the standard tabs for "Reports" and "Dashboards" in the Salesforce interface and in each case (!) in the sharing settings of the "millio" folder added with the installation of millio, share it with the group of all internal users. You can find this sharing option as follows:
Search via the Reports or Dashboards search function > All Folders > millio > Share (using the arrow function on the right). If this step is missed, the millio app homescreen will not display correctly for users without an administrator license.
2.3. Configuration
The first step in configuring the application is to create a configuration record. To do this, please follow the instructions in the video or text below:
First, search for the "millio" app in the App Launcher* or via the search function.
 X
X
Switch to the "Configuration" tab. Here you will already find a configuration record. In this record you have to fill fields with the necessary information to configure millio.
The following fields can be configured:
| Field | Mandatory | Description |
|---|---|---|
| Authenticated | Mandatory field | Indicates whether millio is connected to Salesforce and finAPI. |
| Automations | Optional | Indicates whether the automations are activated or not. |
| Deactivated | Optional | Can/should not be checked by default. Millio can be completely disabled via this setting. |
| Error Email Address | Optional | This field can be used to specify an e-mail address to which notifications will be sent in the event of an error. |
| Debug Mode | Optional | This setting is used for advanced playout of communication details between Salesforce and the finAPI interface. CAUTION: we recommend that you only enable this setting after consulting with Millio Support, as this may expose sensitive access and/or transaction data to other system administrators. |
| Transaction Time Frame | Mandatory field | Specifies the number of days for which transactions from bank accounts are to be imported retroactively from today. We recommend 30 days as default. There may be a technically limited maximum value depending on your bank. |
| Transaction Batch Size | Mandatory field | This setting configures how many transactions are processed simultaneously. In the case of complex follow-on logic that may lead to certain Salesforce limits being reached, we recommend reducing this value. The default 250 is the ideal setting for most use cases. IMPORTANT: If there are more than the specified number of records in your list of open transactions, this will cause some to be missed in the mapping process. Temporarily increase this value or edit open transactions to fix this. |
| Evaluate Multiple Mappings | Optional | This setting configures Millio to continue evaluating other mapping records that may exist, even if the mapping was already successful. |
| Frequency | Mandatory field | This setting determines how often transactions are automatically retrieved from the system. The default value of 4 means that transactions are retrieved 4 times per day. We strongly advise against selecting a higher frequency, as this leads to strong authentication at most banks (e.g. via TAN). Values above 24 lead to a deactivation of automatic transaction retrieval. A 0 in this setting results in hourly retrieval. |
| Start Hour | Optional | Specifies the hour of the day when automatic transaction retrieval should first begin. If not defined, millio uses 0 as the default value. |
| End Hour | Optional | Specifies the hour of the day when the automatic transaction retrieval is to be performed for the last time. If not defined, millio uses 24 as the default value. |
| Creditor Id | Optional | Enter the creditor identification number that you have received from the authorities for the collection of direct debits. You only need this number if you also want to use the "Direct debits" feature. |
 X
X
Note on the configuration of the scheduler
When configuring the automations, it is essential to follow the instructions in the help texts for the "Frequency", "Start Hour" and "End Hour" fields.
In general, the "Frequency" field controls the frequency of automated transaction retrieval, and the "Start Hour" and "End Hour" fields can also be used to restrict the period of the day to which the retrieval is limited. millio divides the available period into equal parts according to the specification in the "Frequency" field. If a value is entered in the "Start Hour" and/or "End Hour" fields, the transaction round call will be executed at the start and end of the defined day period, and also according to the frequency within the period so that the frequency defined in the "Frequency" field is reached. Inputs that would result in execution between full hours are not allowed.
If no entries are made in the "Start Hour" and "End Hour" fields, millio assumes the values 0 (for 0 o'clock) and 24 (for 24 o'clock) here. The specification "4" in the field "Frequency" is therefore valid without specification of values in the fields "Start Hour" and "End Hour" and results in an execution at 0 o'clock, 6 o'clock, 12 o'clock and 18 o'clock. Entering "4" in the "Frequency" field when specifying the value "6" in the "Start Hour" field and "18" in the "End Hour" field results in execution at 6 am, 10 am, 2 pm and 6 pm. Entering "4" in the "Frequency" field when specifying the value "8" in the "Start Hour" field and "16" in the "End Hour" field would be invalid, since the division into 4 equally distributed executions at the full hour is not possible.
At the level of the configuration data set, you will also find the button "Refresh Banks".
If you click this button, you can select which data you want to explicitly update or retrieve. This includes banks, accounts or interfaces and their connections.
 X
X
2.4. Complete purchase process
After you have created the configuration record, you only need to complete the purchase process.
If you want to test millio for 30 days, you can skip this step for now. Otherwise this step is very important for you to be able to use millio!
The license fees for the use of millio will be collected by direct debit from your account.
This is how you can deposit your information:
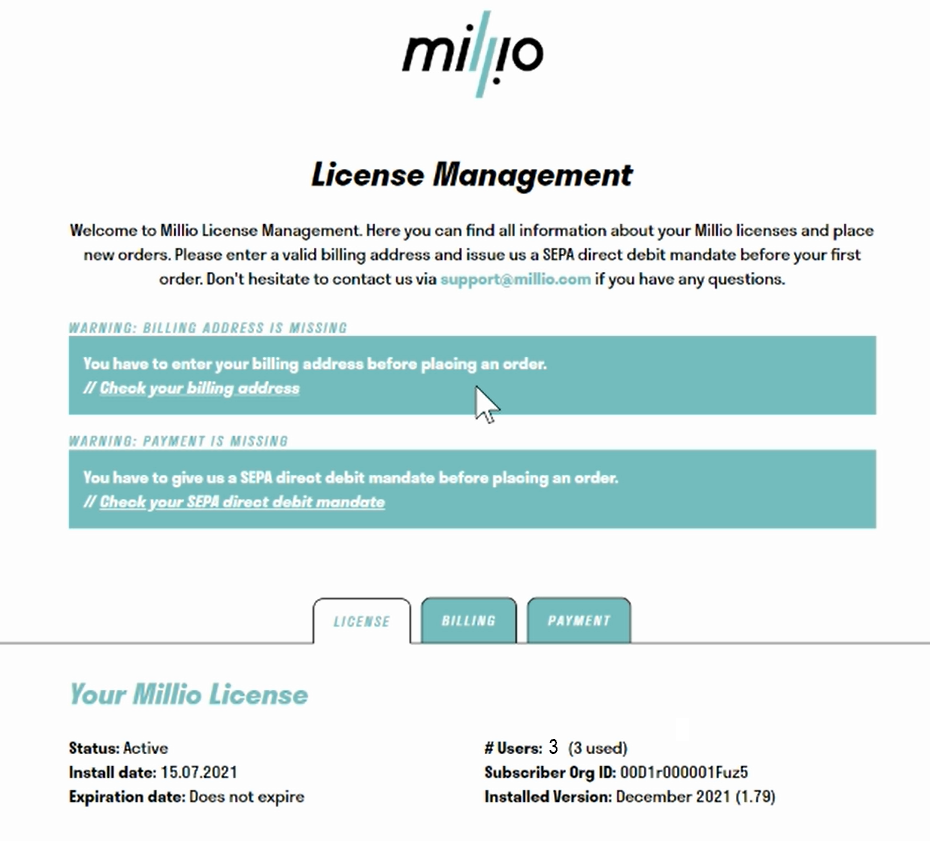
1. In the millio app, you will find the "Manage Licenses" button in the "Configuration" tab. Clicking on the button will open a login page to your license management area. In this customer portal you will find all important data about your millio licenses, payment information, but also the possibility to add more licenses with a click.
Note: The "Manage Licenses" button will no longer be displayed after the 30-day trial period has expired. If you want to order millio licenses after the trial period has expired, contact us and we will give you access to the customer portal.
 X
X
To log in, you will receive a unique code by email, which you enter in the login screen to log in.
2. After logging in, the overview page will open with some instructions on what information you need to provide us so that you can use millio in the future. By clicking on "Check your billing address" you can enter a valid billing address. Then click on "Check your SEPA direct debit mandate" to issue a valid SEPA direct debit mandate.
You can also find the input screens for your data below in the "Billing" and "Payment" tabs.
 X
X
After you have entered and saved the necessary data, you will receive an email confirmation and a document with all information about your SEPA direct debit mandate.
Note: The confirmation email will be sent to the email address that was entered during the millio download in the Salesforce AppExchange.
3. Once you have entered your current payment information, you only have to place your order. The button "Order a new user license" appears:
 X
X
In the next step you can select the number of licenses you want to order:
 X
X
In the final step you will find an overview with all your important information, like billing address, SEPA direct debit mandate as well as number and price of your millio license(s). Click on "Place your chargeable order" to confirm your order and we will activate your licenses within a very short time.
 X
X
Note: If you find any errors in your information in the overview, please contact us directly at support@millio.com so that we can adjust it.
2.5. Authentication
Once the dataset is created and the payment information are given, we need to authenticate with the millio servers to ensure all available functionalities.
This authentication* is done once. To do this, simply click on the "Authenticate" button in the created dataset.
 X
X
After successful authentication (which may have to be finalized by confirming the OAuth2 query), the user is forwarded to a results page. If successful, the authentication is indicated by a check mark in the "Authenticated" field.
 X
X
Note: For advanced security, we strongly recommend enabling Login IP Ranges for the integration user's profile (the user who is authenticating). This restricts access to this user from our server only. The IP address ranges to be defined are:
- IP Start & End Address: 92.205.105.248
- IP Start & End Address: 2a00:1169:11d:7b40::
2.6. Adding a bank account
To import account transactions, a bank connection is required in the finAPI system. Here, new bank connections can be set up as well as existing bank connections can be retrieved from the finAPI system.
To set up a new bank connection, the configuration starts with the creation of a "Bank" record on the level of your "Configuration" record. To do this, click on the "New" button in the "Bank" list of your configuration.
 X
X
Enter the BIC or the name of your desired bank and click on the "Search" button.
 X
X
If millio finds more than one bank through the finAPI interface, select exactly the bank you want to add among those offered and click the "Create" button.
 X
X
millio stores a corresponding "Bank" record in Salesforce. Consequently, this also appears in the previously empty "Bank" list at the level of the "Configuration" record.
Configuration continues at the level of this new record.
Which communication channel should be used for the communication with the bank can be configured in millio via so-called interfaces. These vary depending on the bank.
There are the interface types Web Scraper, FinTS and XS2A.
Web Scraper, FinTS und XS2A
Not all banks support all interface types. Which interface types are supported depends on the bank itself. When retrieving and creating the bank record, millio imports all technically available interfaces. We generally recommend using XS2A, as this is the most modern standard. However, mere availability does not yet guarantee error-free functionality, as some banks only offer XS2A in test mode for the time being or do not (yet) support certain account types or functions. For example, the collection of direct debits is currently only offered via FINTS. Before using the XS2A interface, we recommend that you obtain information from the bank to be connected as to whether and to what extent XS2A is supported. FINTS is the older, but more mature standard and has the advantage of offering the highest compatibility for most banks. If XS2A is not supported by your bank or only with restrictions, even if direct debits are important for you, we recommend to connect your bank via FINTS. Only if there is no alternative, we recommend using the "Web Scraper" interface, as experience has shown that the error rate during import is highest here.
In principle, millio can connect to your bank via several interfaces in parallel. If this is not needed, you can simply delete the interfaces you don't want. We generally recommend this, because it reduces the frequency of requests for strong authentication and the general risk of errors.
 X
X
Further fields do not have to be configured and should not be changed at this point.
Now the configured bank connection has to be linked to the finAPI system. To do this, click on the "Connect" button at the level of the "Bank" record.
 X
X
If you have configured more than one interface, millio will now ask you which of the available interfaces you want to link. Don't worry: you can link the other interfaces as well afterwards. Confirm your choice.
Depending on the bank and the selected interface, you may be asked for additional strong authentication during the connection.
After the required steps have been completed (for example, entering a TAN), the application will acknowledge the successful bank connection with a corresponding message. If successful, a check mark now appears in the "Connected" field of the bank as well as in the "Connected" field of the previously selected interface after updating the "Bank" record. Available accounts are displayed in the account list at the level of the "Bank" record.
Repeat the previous step by clicking the "Connect" button to connect additional interfaces. The finAPI bank connection setup is now complete.
Bank connections already existing in the finAPI system can be imported by clicking the "Refresh Banks" button on the level of the "Configuration" data set. In addition to the bank connection itself, this import will retrieve directly available accounts and already connected interfaces and display them in Salesforce for further use. You can also use this button to compare the current configuration of your banks with the status at finAPI and thus update it in Salesforce.
 X
X
Bank authentication
Most banks store permission to retrieve data again in the system after successful strong authentication. This means that strong authentication does not have to be repeated for every transaction retrieval. Most banks allow daily retrieval of transactions up to 4 times for a maximum period of 90 days without further agreement. If retrieved more frequently or after the period has expired, strong authentication is required again. The retrieval will then fail once and an appropriate error message will be displayed indicating that the transaction retrieval consent is no longer valid. In this case, the transaction fetch must be executed again once. In this way, strong authentication is used to grant consent to the transaction call.
Testing with finApi demo banks
The entire process can be tried out very conveniently with the test banks that finApi provides us with for this purpose. To do this, search for "finApi" when creating the bank record and select one of the banks offered there. These banks allow most actions without actual transactions being executed in the background.
Via the "Delete" button in the "Configuration" tab, the bank data record including all data stored with finAPI can be easily removed from the millio configuration again.
 X
X
2.7. Set up notifications
Push notifications for one or more Salesforce users can be set up via "Notification Settings". Push notifications are generated in the following cases:
- Upon successful allocation of incoming transactions.
- For automated generation of "Money Transfer" and "Direct Debit" records from transfer or direct debit templates.
To set up push notifications, click the "New" button in the "Notification Settings" list directly in your configuration record to create a new "Notification Setting" record.
 X
X
The configuration is done by filling in the following fields:
| Field | Mandatory | Description |
|---|---|---|
| Configuration | Mandatory field | Reference to the "Configuration" record. |
| User | Mandatory field | The Salesforce user to be notified. |
| Active | Optional | The status of the notification setting. If this checkbox is disabled, no notifications will be sent to the corresponding user despite the "Notification Setting" record. |
 X
X
NOTE ON ENABLING PUSH NOTIFICATIONS FOR MOBILE DEVICES
To enable push notifications for mobile devices, the notification type "millio Notification" must be edited in the Salesforce setup in the menu item "Notification Delivery Settings" and the respective app to be supported must be selected there under "Applications".
2.8. Resetting the Configuration
You can reset millio by clicking on the "Reset Configuration" button in the upper right corner at the configuration record level. The following data will be deleted:
- All data stored at finAPI.
- All "Bank" records.
- All "Account" and other records directly subordinated to the bank.
- All transactions associated with one of the deleted accounts.
- All "Payment" records associated with one of the deleted accounts.
- All "Money Transfer" and "Direct Debit" records belonging to one of the deleted "Payment" records.
The following data will not be deleted:
- The configuration data set.
- "Mapping" data sets with subordinate data structure.
- Standing orders and order templates in the form of "Template" data records.
- "Result" records located in the system.
NOTE ON THE USE OF MILLIO IN SANDBOXES
If you want to use millio in a sandbox, the installation process basically works exactly the same as in a live environment. The only exception is when the sandbox is created after installing millio, i.e. millio is already pre-installed in the sandbox with partially existing configuration data. In this case, it is mandatory to use the "Reset Configuration" button for smooth operation.
After resetting the configuration, it is mandatory to authenticate again by clicking the "Authenticate" button.
2.9. Record Page Activation
Since Salesforce unfortunately does not allow the activation of record pages with simultaneous use of record types when installing applications such as millio, this must be done manually once after installation.
Specifically, this concerns the object "Field Configuration". You can find it in the setup by searching for "Lightning App Builder" in the search bar.
In the Lightning App Builder, assign the following Record Pages to each respective type:
| Record Page | Record Type |
|---|---|
| Dynamic Field Configuration Record Page | Dynamic |
| Static Field Configuration Record Page | Static |
You can do the assignment as follows:
Click Page > View > Activate > Assign to Applications, Record Type and Profiles > Select millio > Next > Desktop and Phone > Next > Click Static or Dynamic > Next > Select All Profiles > Save.
3. Operational use
In this chapter, we describe how you can get the most out of millio. This also requires minor configurations, which - like the configurations already done - only need to be performed once.
3.1. Import of Account Transactions
With the successful setup of the finAPI bank connection, the retrieval of transactions is already fully functional. Your linked accounts are already displayed in the "Accounts" list of the "Bank" record.
If you don't want to import all available transactions, but only a certain selection (for example, only incoming transactions), or if you want to exclude certain transactions from import (for example, transactions from a certain sender), you can set this up via special "Import Condition" records at the level of the respective "Account" record, i.e. at the level of the account.
To do this, click on the "New" button in the associated "Import Condition" list at the level of an "Account" data set.
The configuration is done by filling in the required fields:
| Field | Mandatory | Description |
|---|---|---|
| Name | Mandatory field | Own, freely selectable name of the rule. |
| Account | Mandatory field | Reference to the account record belonging to the rule. |
| Field Name | Mandatory field | Information component of the transaction to be filtered. |
| Operator | Mandatory field | Comparison operator to be used for filtering. |
| Condition Value | Mandatory field | Value by which to filter. |
Note to Condition Value
The "Condition Value" field is a free text field to ensure maximum flexibility. This requires special care when defining the filter value, the possibility of configuration errors is correspondingly high. Therefore, please be sure to follow the instructions in the information area of the field. Date, time and decimal values must be formatted correctly.
- Date specifications in the pattern
yyyy-mm-dd, for example2020-07-09 - Time specification in the pattern
yyyy-mm-dd hh:mm:ss, for example2020-07-09 17:36:00 - Decimal values in the pattern
0.0, i.e. with a dot as separator, for example10.5
The following screenshot shows the example configuration of a filter to import only positive account transactions:
Clicking the "Update Accounts" button at the "Bank" record level retrieves all available transactions for all deposited accounts (visible in associated "Account" list).
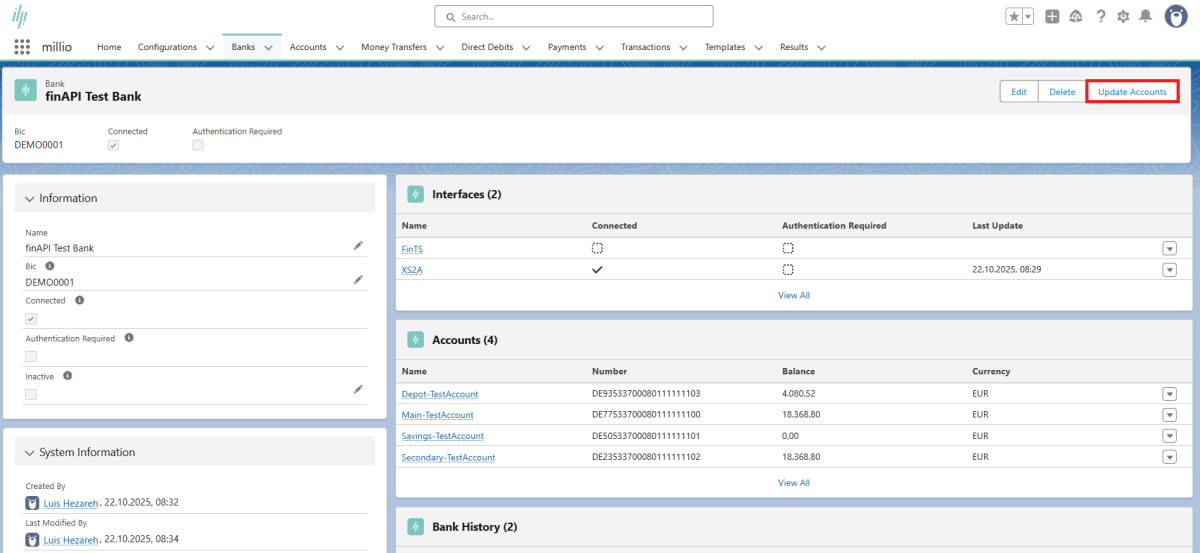 X
X
When updating an account, additional authentication may be required depending on the bank. If this is the case, a pop-up window will open where you can complete the authentication process. Once the updates have been successfully completed, the window will close automatically.
Clicking on one of the available "Account" records will display the transactions now imported accordingly.
3.2. Assignment of incoming transactions
In addition to importing account transactions, Millio has the option of automatically assigning imported transactions to any Salesforce data structures.
This makes sense, for example, if incoming payments on the accounts are to be automatically assigned to open invoices or customer records.
The assignment of transactions to any data records follows the pattern that transaction components are matched with information in Salesforce and can be assigned via individually configurable assignment data records if the search in the system is successful (mapping*).
This automatic assignment is configured using "Mapping" data records at the "Configuration" data record level and "Mapping Condition" and "Target Object" data records subordinate to these "Mapping" data records. "Field Configuration" datasets are also subordinate to the "Target Object" datasets. But more about this in the following:
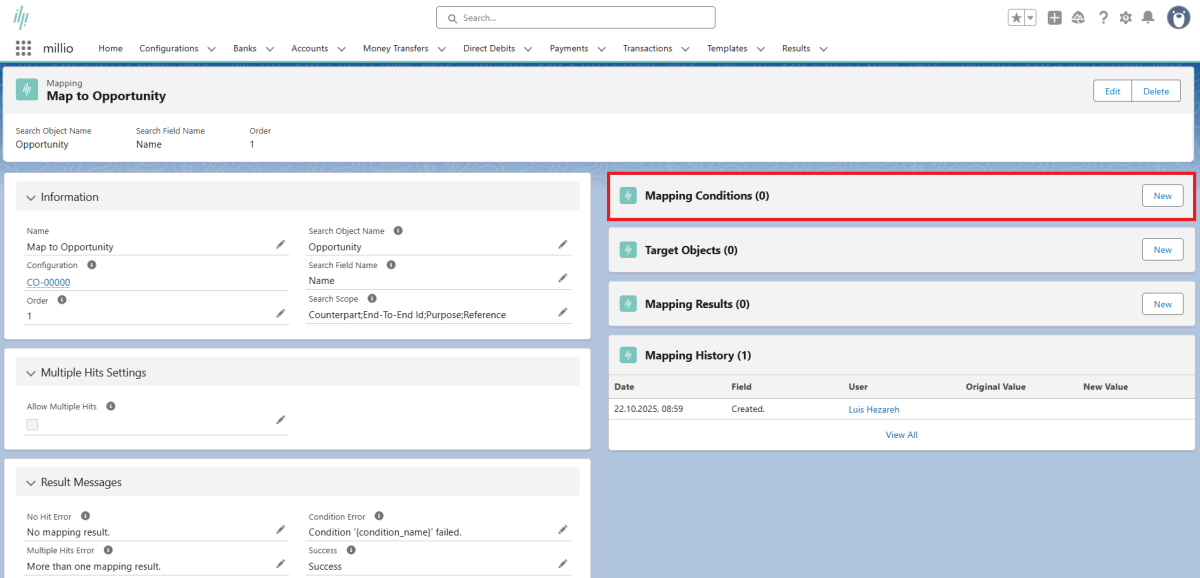
Mapping records control which objects* are to be matched with transactions and which field is basically compared with the subject of the imported transaction. For example, this could be an invoice record and the matching could be done by invoice number.
"Mapping Condition" records in turn control what criteria should be used to match. For example, a summary field at the level of the invoice record should be matched with the "Amount" field at the level of imported account transactions.
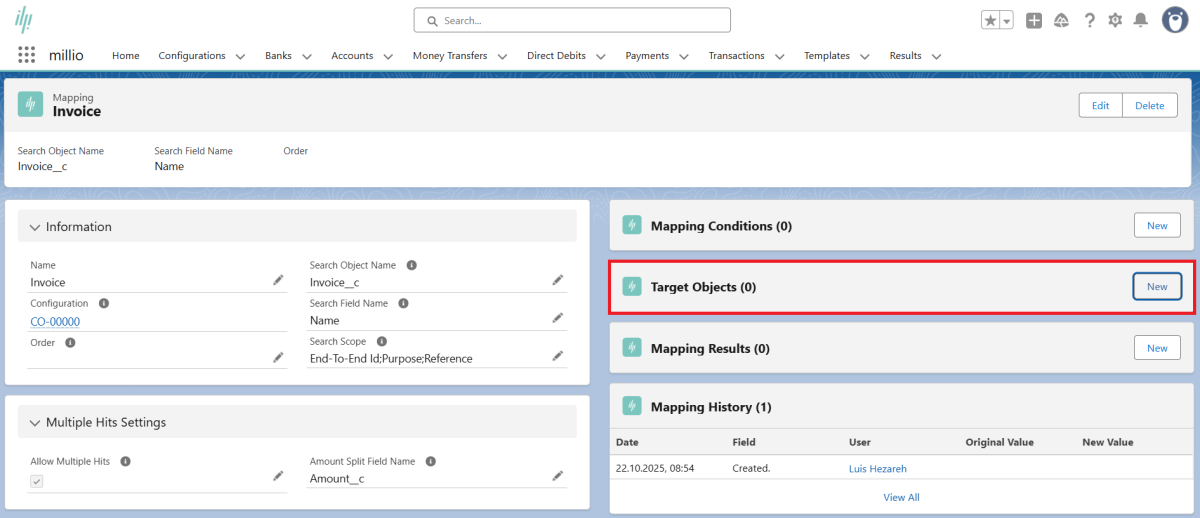
"Target Object" records control which records should be generated for matching if the search is successful in the system. This can be, for example, a payment record subordinate to the invoice record. "Field Configuration records are used to configure the fields to be filled in when the mapping record is created.
Both invoice and assignment object are individual Salesforce records to be configured by the user. In our example, the invoice record would be created in the structure of a Salesforce custom object "Invoicec". The assignment record would be another custom object "Paymentc" with links to the object "Invoice__c" and the record type "Transaction" installed with Millio.
The result of automated mapping is stored at the level of imported "Transaction" records in subordinate "Mapping Result" records. This ensures the necessary transparency in case of mapping errors.
Data record types can be selected completely arbitrarily. In addition to objects from the familiar Salesforce standard structure, Millio also works with any installed or self-configured custom object.
In our example, we want to match incoming transactions with existing invoices in the system or their invoice numbers in the "Name" field. For this purpose, we have created a custom object "Invoice" in the system below the opportunity. The matching will be done via a connection object "Payment", which we have also created as a new custom object. Mapping should only be done if the value of the incoming transaction matches a custom field "Amount" on the "Invoice" level.
To add a "Mapping" record, click the "New" button in the list of "Mapping" records at the "Configuration" record level.
An interface for creating a "mapping" record opens. Fill in the following fields for the configuration:
| Field | Mandatory | Description |
|---|---|---|
| Name | Mandatory field | Own, freely selectable assignment rule. |
| Configuration | Mandtory field | Reference to the "Configuration" record. |
| Order | Optional | The desired rule priority. This determines the order in which configured assignment rules are executed. |
| Search Object Name | Mandatory field | The API name of the object (Custom or Standard) that will be matched against imported transactions. |
| Search Field Name | Mandatory field | The API name of the field that will be matched with the "Purpose" field of imported transactions. |
| Search Scope | Mandatory field | Here you specify in which areas of the incoming transaction to search. |
| Allow Multiple Hits | Optional | Defines whether multiple search hits are allowed or not. If not, an error message will be displayed in case of multiple search hits. |
| Amount Split Field Name | Optional | The API name of the field used for splitting the transaction amount in case of more than one search hit. |
| No Hit Error | Mandatory field | Specifies the error message that will be displayed in case of no search hit at the level of the resulting "Mapping Result" record. |
| Multiple Hits Error | Mandatory field | Specifies the error message displayed in case of multiple search hits at the level of the resulting "Mapping Result" record. |
| Condition Error | Mandatory field | Specifies the error message that will be displayed at the level of the resulting "Mapping Result" record in case of mismatching "Mapping Conditions". Use '{condition_name}' as placeholder for the condition name. |
| Success | Mandatory field | Specifies the message that will be displayed at the level of the resulting "Mapping Result" record in case of a successful mapping. |
The following screenshot shows an example mapping record for configuring a match with the number of invoices in the system:
 X
X
The task now is to define concrete criteria for matching incoming transactions. These determine the conditions under which records found in the system are matched exactly.
To do this, go to the "New" button in the "Mapping Condition" list of the created "Mapping" data set.
 X
X
To configure a new condition, fill in the following fields:
| Field | Mandatory | Description |
|---|---|---|
| Name | Mandatory field | Own, freely selectable name of the assignment rule. |
| Mapping | Mandatory field | Reference to the corresponding "mapping" record. |
| Field Name | Mandatory field | API name of the field at the level of the "search object" (e.g. the invoice) for which certain conditions are to be matched. |
| Operator | Mandatory field | Comparison operator to be matched. |
| Condition Value | Optional | Value to be filtered by. Please refer to the notes on the field with the same name at the level of the "Import Condition" record. They are equally valid here as well. |
Please note the following formatting requirements when storing values in the "Condition Value" field:
- Date specifications in pattern
yyyy-mm-dd, for example2020-07-09 - Time specifications in pattern
yyyy-mm-dd hh:mm:ss, for example2020-07-09 17:36:00 - Decimal values in pattern
0.0, with dot as separator, for example10.5
In addition, the following placeholders (each without quotation marks) can be used here for values of imported transactions:
{amount}for the transaction amount{bic}for the BIC{counterpart}for the name of the sender or recipient{currency}for the currency abbreviation (e.g. "EUR") of the transaction{date}for the date of the transaction{end_to_end_id}for the end-to-end customer reference{iban}for the IBAN{sepa_purpose_code}for the SEPA code according to ISO 20022
The following screenshot shows an example configuration of a "Mapping Condition" record for matching the "Amount" field of imported transaction records with the "Amount" field of invoices found in the system.
 X
X
NOTE ON EVALUATING MULTIPLE SEARCH HITS #1
If mapping to more than one search hit has been enabled by configuring the "Allow Multiple Hits" field (for example, when transferring more than one invoice in one payment), sum fields are added up before evaluating a "Mapping Condition" of all search hits. Thus, a condition configured on a number field will only be evaluated as TRUE if the sum of the values of all search hits together match the configured condition.
Target Objects
To configure a "Target Object" dataset, click the "New" button in the "Target Object" list of the "Mapping" dataset.
 X
X
To configure a new "Target Object" fill out the following fields:
| Field | Mandatory | Description |
|---|---|---|
| Name | Mandatory field | The API name of the mapping object to be created. |
| Object Name | Mandatory field | The API name of the mapping object to create. |
| Mapping | Mandatory field | Reference to the corresponding mapping record. |
The following screenshot shows the exemplary configuration of a "Target Object" record for the creation of a "Payment" record on the level of an invoice found per previously configured "Mapping" object.
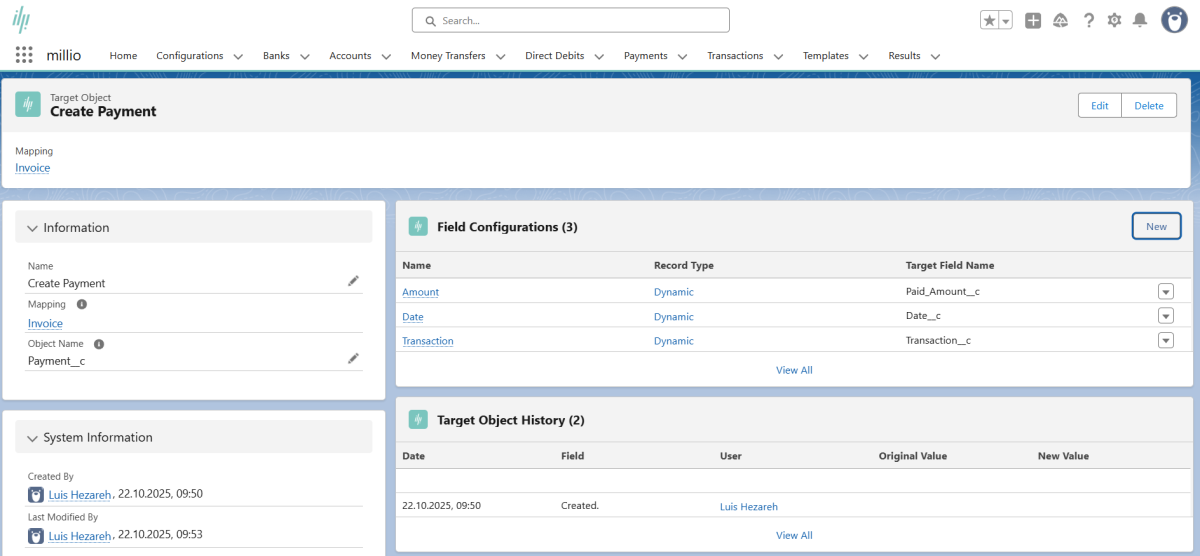 X
X
The configuration also requires the creation of at least one "Field Configuration" record subordinate to the "Target Object". These are used to configure the fields of the target data set to be filled by Millio.
You create them via the "New" button in the "Field Configuration" list subordinate to the "Target Object".
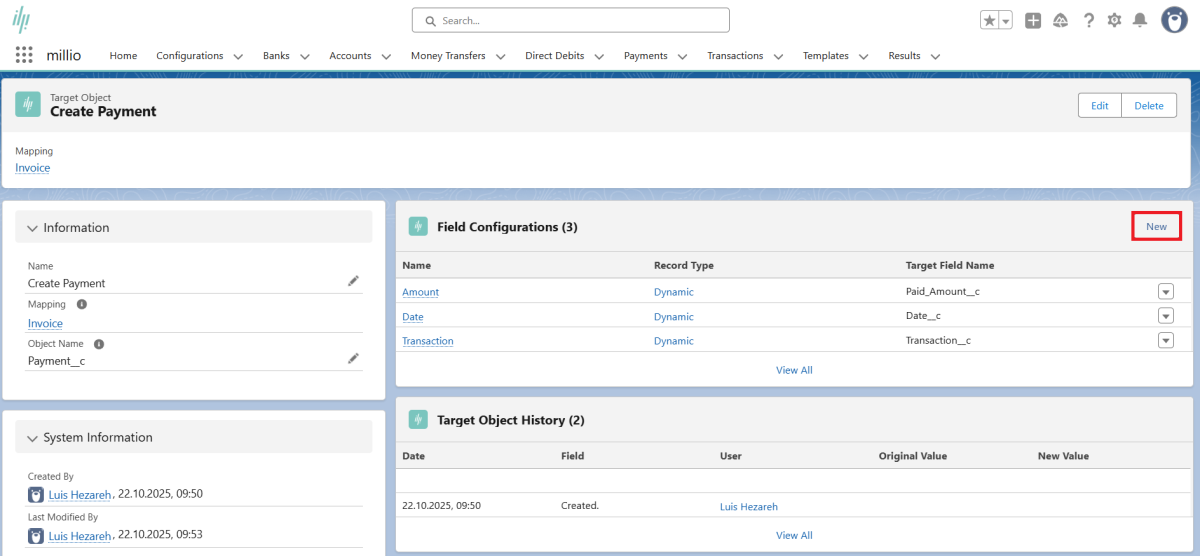 X
X
Now select the type of "Field Configuration" data set. There are two options:
- "Dynamic": for filling fields of the target record from fields of transaction or search object.
- "Static": for filling fields of the target record using static text values.
To configure a new "Field Configuration" record, fill in the following fields:
| Field | Mandatory | Description |
|---|---|---|
| Name | Mandatory field | Own, freely selectable name of the assignment rule. |
| Target Object | Mandatory field | Reference to the corresponding "Target Object" record. |
| Source Object Type | Mandatory field | Defines by dropdown from which matched data set data should be transferred to the Target Data Set. |
| Source Field Name | Mandatory field | Defines the API name of the field at the level of the source data set from which data is to be transferred. |
| Source Value | Mandatory field | Defines the static text value to be copied to the target field of the target record. |
| Target Field Name | Mandatory field | Specifies the API name of the field at the level of the target data set to which the source field data is to be transferred. |
Depending on the selection of the type of "Field Configuration" data set, either "Source Object Type" & "Source Field Name" or "Source Value" are available in the interface.
The following screenshot shows the exemplary configuration of a "Field Configuration" record for the transfer of the "Id" field of the found invoice into the "Invoice" field of the "Payment" record to be created.
 X
X
In our example, we will create additional "Field Configuration" records for linking to the transaction and transferring the "Amount" and "Date" fields.
Newly created "Field Configuration" records appear in the corresponding list at the "Target Object" record level.
NOTE ON FILLING THE "SOURCE VALUE" FIELD
The Source Value field is a free text field to ensure maximum flexibility. This requires special care when defining the value, the possibility of configuration errors is correspondingly high. Therefore, please be sure to follow the notes in the information area of the field. Date, time and decimal values must be formatted correctly.
Please note the following formatting requirements when storing values in the "Source Value" field:
- Date specifications in pattern
yyyy-mm-dd, for example2020-07-09 - Time specifications in pattern
yyyy-mm-dd hh:mm:ss, for example2020-07-09 17:36:00 - Decimal values in pattern
0.0, with dot as separator, for example10.5
In addition, the following placeholders (each without quotation marks) can be used here for values of imported transactions:
{amount}for the transaction amount{bic}for the BIC{counterpart}for the name of the sender or recipient{currency}for the currency abbreviation (e.g. "EUR") of the transaction{date}for the date of the transaction{endtoend_id}for the end-to-end customer reference{iban}for the IBAN{sepapurposecode}for the SEPA code according to ISO 20022
Text values assigned to created target records are shortened if they are too long for the target field.
The created configuration can be tested and executed via the "Map Transactions" button on the "Configuration" record level.
 X
X
You can also test and map individual transactions via the "Map" Button on the Transaction layer.
NOTE ON EVALUATING MULTIPLE SEARCH HITS #2
If the name of a number field has been defined in the "Amount Split Field Name" field at the search object level, the value of the transaction will be split according to the values of this field when the transaction total is assigned to the "Target Object" record. If individual search hits do not have a value in this field, these search hits are assigned a value of 0. If none of the search hits has a value defined in this field, the transaction sum is divided into equal parts.
NOTE ON PUSH NOTIFICATIONS
You want to notify yourself or other Millio users about successfully assigned transactions via push notification? Then create "Notification Setting" records for each of these users. To do this, click the "New" button in the list of "Notification Setting" records at the "Configuration" record level.
NOTE ON LIMITS
Please note that Salesforce only allows the retrieval of a maximum of 50,000 data records. millio will reach this limit if more than 49,000-50,000 data records exist in the system for each mapping to be evaluated. If millio reports a corresponding error, we recommend the addition of (possibly further) "Mapping Condition" records in order to reduce the total number of data records to be retrieved for this mapping.
3.3. Sending outgoing payments
millio enables outgoing payments to be triggered directly from Salesforce. Outgoing payment records are created and configured via the "Money Transfer" object.
These are then combined into a "Payment" record for transmission. "Money transfer records can be generated manually or automatically. Basically, there are the following three options for generating "Money Transfer" data records:
- Manual creation via the "Money Transfers" tab
- Partially automated generation via a button to be configured for this purpose
- Fully automated generation via Apex or Salesforce Flows
Manual creation
To create an outgoing payment record manually, go to the "Money Transfers" tab and click the "New" button there.
 X
X
In the interface that opens, the following required information can be entered:
| Field | Mandatory | Description |
|---|---|---|
| Payment | Optional | Reference to the corresponding payment record. If empty, the record is considered "Open" by default. |
| Amount | Mandatory field | Contains the transfer amount. |
| Purpose | Optional | Contains the transfer subject. |
| Counterpart | Mandatory field | Contains the recipient's name. |
| Iban | Mandatory field | Contains the Iban of the recipient account. |
| Bic | Mandatory field | Contains the Bic of the recipient bank. |
| SEPA Purpose Code | Optional | Contains a SEPA purpose code according to ISO 20022. |
| End-to-End Id | Optional | Contains the end-to-end customer reference according to ISO 20022. |
By clicking on "Save" the payment record will be created, provided that all required fields are filled in.
Please note that for many of the fields only certain characters are allowed. Which characters is regulated by the ISO standard 20022. According to this only characters from the following ranges are allowed: a - z, A - Z, 0 - 9, the special characters /?:().,'+- as well as spaces.
 X
X
Semi-automated creation via a button
For the semi-automated generation of payment records, the app provides a Visualforce page to which data that can be determined from the data context via parameters can be passed for pre-filling. This URL can be called via button from any object in the data structure.
The basic call URL is /apex/millio__CreateMoneyTransfer . Data must / can be passed to this Url using the following URL parameters:
| Field | Mandatory | Description |
|---|---|---|
| amount | Optional | The transfer amount as text parameter. |
| purpose | Optional | The remittance subject as text parameter. |
| counterpart | Optional | The recipient's name as text parameter. |
| iban | Optional | The recipient's iban as text parameter. |
| bic | Optional | The BIC of the recipient as text parameter. |
| sepaPurposeCode | Optional | Contains a SEPA purpose code as text parameter. |
| endToEndId | Optional | Contains the end-to-end customer reference as text parameter. |
| referenceFieldName | Optional | This parameter can optionally be used to create a reference to the record triggering the payment (see note for details) |
| accountId | Optional | Contains the Salesforce ID of a millio account. If specified, the user will be redirected to the page for creating an associated "Payment" record after the record has been created. |
As a result the exemplary URL of such a button could look like this:
/apex/millio__CreateMoneyTransfer?id={!Invoice__c.Id}&counterpart={!Invoice__c.Account_Name__c}&iban={!Invoice__c.Account_Iban__c}&bic={!Invoice__c.Account_Bic__c}&amount={!TEXT(Invoice__c.Amount_Paid__c)}&purpose=Refund+of+invoice+{!Invoice__c.Number__c}For our example, we have configured fields at the account level to store Iban and Bic. At the level of our self-created "Invoice" object, we reference the account name as well as these additional fields in formula fields, which we then use in the above example URL.
NOTE ON THE REFERENCEFIELDNAME PARAMETER
The parameter "referenceFieldName" can optionally contain the name of a self-generated lookup field on the level of the "Money Transfer" record. If the parameter is filled with the name of an existing lookup field with reference to the triggering record type, Millio will fill this reference field with the Id of the actual triggering record when generating the payment record.
Don't forget to add the button to the Page Layout!
Fully automated creation
For fully automated generation, the usual Salesforce standard automation mechanisms such as Apex and Flows can be used.
Transfer payments between own accounts
Transferring money from your own account to another (own) account is very easy with millio.
To do this, you will find the button "Internal Transfer" in the account or account data record. For a transfer, select the corresponding account from which you want to transfer money to another of your accounts. Click the button "Internal Transfer" on the account level. A selection of all other accounts connected to millio opens.
Select the corresponding bank account and a pre-filled transfer mask will open. Add only the amount and reason for payment and create the transfer data record with a click.
3.4. Direct debit collection
Similar to the creation of outgoing payments, direct debits can also be triggered directly from Salesforce.
Outgoing payment records are created and configured via the "Direct Debit" object. For transmission, these are also combined in a "Payment" data record. "Direct Debit" data records can be generated both manually and automatically. Basically, there are the following three options (identical to outgoing payments) for generating "Direct Debit" data records:
- Manual creation via the "Direct Debits" tab
- Partially automated generation via a button to be configured for this purpose
- Fully automated generation via Apex or Salesforce Flows
To create an outgoing payment record manually, go to the "Direct Debits" tab and click the "New" button there.
 X
X
Enter the necessary information in the interface that opens:
| Field | Mandatory | Description |
|---|---|---|
| Amount | Mandatory field | Contains the transfer amount. |
| Purpose | Optional | Contains the transfer subject. |
| Counterpart | Mandatory field | Contains the recipient's name. |
| Address | Optional | Contains the recipient's address. |
| Country | Optional | Contains the recipient's country code. |
| Iban | Mandatory field | Contains the IBAN of the recipient account. |
| Bic | Mandatory field | Contains the BIC of the recipient bank. |
| SEPA Purpose Code | Optional | Contains a SEPA purpose code according to ISO 20022. |
| End-To-End Id | Optional | Contains the end-to-end customer reference according to ISO 20022. |
| Mandate Id | Mandatory field | The Mandate ID of the valid direct debit mandate. |
| Mandate Date | Mandatory field | The date of the valid direct debit mandate. |
Please note that for many of the fields only certain characters are allowed. These characters are defined in the ISO 20022 standard, which only allows characters from the following ranges: a - z, A - Z, 0 - 9, the special characters /?:().,'+- and spaces.
Click on "Save" to generate the direct debit record, provided that all required fields are filled in.
 X
X
For the partially automated generation of direct debits, the app provides a Visualforce page to which data that can be determined from the data context can be transferred via parameters for pre-filling. This URL can be called via a button from any object in the data structure.
The basic call URL is:
/apex/millio__CreateDirectDebit
Data must/can be passed to this URL via the following URL parameters:
| Parameter | Mandatory | Description |
|---|---|---|
| amount | Optional | The transfer sum as text parameter. |
| purpose | Optional | The transfer subject as text parameter. |
| counterpart | Mandatory field | The name of the recipient as text parameter. |
| address | Mandatory field | Contains the recipient's address as a text parameter. |
| country | Mandatory field | Contains the country code of the recipient as a text parameter. |
| iban | Optional | The Iban of the recipient as text parameter. |
| bic | Optional | The Bic of the recipient as text parameter. |
| sepaPurposeCode | Optional | Contains a SEPA Purpose Code as text parameter. |
| endToEndId | Optional | Contains the end-to-end customer reference as a text parameter. |
| mandateId | Optional | The id of the underlying direct debit mandate as text parameter. |
| mandateDate | Optional | The date of the underlying direct debit mandate as text parameter in the format YYYY-MM-DD. |
| referenceFieldName | Optional | This parameter can optionally be used to create a reference to the data set triggering the payment. |
| accountId | Optional | Contains the Salesforce ID of a millio account. If specified, the user will be redirected to the page for creating an associated "Payment" record after the record has been created. |
| directDebitType | Optional | The type of direct debit order (BASIC/B2B). If specified, the user will be redirected to the page for creating an associated "Payment" record after the record has been created. |
| sequenceType | Optional | The sequence of the direct debit order (OOFF/FRST/RCUR/FNAL). If specified, the user will be redirected to the page for creating an associated "Payment" record after the record has been created. |
| executionDate | The execution date of the direct debit order as a text parameter in the format YYYY-MM-DD. If specified, the user will be redirected to the page for creating an associated "Payment" record after the record has been created. |
As a result, the exemplary URL of such a button can look as follows:
/apex/millio__CreateDirectDebit?id={!Invoice__c.Id}&counterpart={!Invoice__c.Account_Name__c}&iban={!Invoice__c.Account_Iban__c}&bic={!Invoice__c.Account_Bic__c}&amount={!TEXT(Invoice__c.Amount_Open__c)}&purpose=Buchung+zu+Rechnung+{!Invoice__c.Number__c}&mandateId={!Invoice__c.Account_Mandate_Id__c}&mandateDate={!Invoice__c.Account_Mandate_Date__c}For our example, we have configured fields at the account level to store Iban and Bic, Mandate Id and Mandate Date. At the level of our self-created "Invoice" object, we reference the account name as well as these additional fields in formula fields, which we then use in the above example URL.
The conversion of the mandate date into the correct format is done within the formula field. Its syntax is as follows:
TEXT(YEAR(Opportunity__r.Account.Mandate_Date__c)) & '-'
+ TEXT(MONTH(Opportunity__r.Account.Mandate_Date__c)) & '-'
+ TEXT(DAY(Opportunity__r.Account.Mandate_Date__c))
Sum values may also have to be converted to the correct format when transferred. This is done as shown in the example using the function &amount={!TEXT(Invoice_c.AmountPaid__c)} directly in the transfer parameter.
NOTE ON THE REFERENCEFIELDNAME PARAMETER
The parameter "referenceFieldName" can optionally contain the name of a self-generated lookup field on the level of the "Direct Debit" record. If the parameter is filled with the name of an existing lookup field with reference to the triggering record type, Millio will fill this reference field with the Id of the actual triggering record when generating the direct debit.
Don't forget to add the button to the Page Layout!
For fully automated generation, the usual Salesforce standard automation mechanisms such as Apex and Flows can be used.
3.5. Creating payment orders
Payment records and direct debits are transmitted by means of aggregation in "Payment" records.
These payment orders contain further information such as the account from which payments or direct debits are to be executed or the execution date.
"Payment" records can reference either "Money Transfer" OR "Direct Debit" records. A mixed summary and transmission is not possible!
You can create "Payment" records from list views of "Money Transfer" or "Direct Debit".
To do this, select the corresponding entries in the respective list view of the payment records that have not yet been transferred ("Open Money Transfers" or "Open Direct Debits"). Then click on the "Create Payment" button.
 X
X
If you want to create a payment order for a single "Money Transfer" or "Direct Debit" record only, you can alternatively use the "Create Payment" button to go to the level of the respective record.
 X
X
The interface that opens lists the payment records or direct debits taken into account and asks for the following required parameters:
| Field | Mandatory | Description |
|---|---|---|
| Account | Mandatory field | Associates the account to be posted. |
| Single Booking | Optional | Defines whether linked payments should be sent to the bank individually or collectively. If selected, the payments will be shown individually on the own bank statement, if not, as a collective item. |
| Execution Date | (Mandatory field) | The execution date of the order. If nothing is entered here, the order will be executed immediately. Mandatory for direct debits. |
| Direct Debit Type | (Mandatory field) | The type of direct debit order (Basic/B2B). Only available for direct debits. |
| Sequence Type | (Mandatory field) | The sequence of the direct debit order (One Time/First/Recurring/Final). Only available for direct debits. |
 X
X
After clicking on "Create", the created "Payment" record will be displayed.
 X
X
3.6. Transmitting payment orders
An overview of payment orders that have not yet been transmitted to the bank is displayed in the "Open Payments" list view.
 X
X
Payment orders are submitted to the bank by clicking the "Submit" button at the level of the previously created "Payment" record.
 X
X
In addition to the input data, the result of the transmission is displayed in the "Payment" record in the "Status" field after transmission.
In the "Message" field, a possible message from the bank is displayed.
In case of error, the error message is displayed after clicking "Submit" in the main area of the browser window.
In case of success, it is redirected back to the "Payment" record. The result can be checked in the status field of the "Payment" record.
In the event that two-factor authentication is required, the submitting user is redirected to the correspondingly required input mask.
3.7. Cloning payment orders
In case of an error in the transmission of a payment order, it may make sense to resubmit a payment order to the bank.
Since payment orders that have already been transmitted cannot be retransmitted to the bank, the payment order must be cloned beforehand.
Cloning of payment orders is performed by clicking the "Clone" button at the level of the previously incorrectly submitted "Payment" record.
 X
X
In addition to the payment order itself, all subordinate "Money Transfer" or "Direct Debit" records are also cloned.
3.8. Working with order templates
With "Templates" Millio has the possibility to create order templates and standing orders. Regular "Money Transfer" or "Direct Debit" records can be generated from order templates with a click or fully automatically.
Template" records are created in one of the following ways:
- Manually via the "New" button in the "Templates" tab.
- By clicking the "Create Template" button from an existing "Money Transfer" or "Direct Debit" record.
No matter which way the generation is done, the data of the underlying record type ("Money Transfer" or "Direct Debit") has to be configured first. In case of manual generation, the values have to be entered manually, in case of generation from an existing payment record, the contents of this payment record are taken over into the interface for the generation of a "template" data record.
Optionally, the following fields of the layout section "Schedule information" can be used to configure the regularly automated creation of records from the respective template:
| Field | Mandatory | Description |
|---|---|---|
| Monthly Frequency | Optional | The frequency at which records are to be generated automatically. The specification 1 in this field defines that a record should be generated every month, a 2 stands for every second month and so on. |
| Day Of Month | Optional | The day on which the automatic creation of the respective target data set should take place. A 15 means that the creation should always take place on the 15th of a month. Entering a value that is invalid for the evaluated month (e.g. a 31 for the month February) results in a generation on the last day of the month. |
| Start Date | Optional | The date on which automation is to be started. |
| End Date | Optional | The date by which records are to be generated automatically at the latest. |
Accordingly, "template" data records can be used to configure more complex automations for standing orders or recurring direct debits in addition to simple order templates for the manually simplified generation of payment and direct debit data records.
NOTE ON THE TRANSMISSION OF STANDING ORDERS
When "Money Transfer" or "Direct Debit" records are generated automatically, it is essential to note that they must be transmitted to the bank manually by generating a "Payment" record following the automated generation. This is necessary because transmission to the bank requires strong authentication in almost all cases. Automatically generated data records can be transmitted to the bank together with data records generated in any other way without any problems.
3.9. Activating the automatic broadcast
The updating of bank data, specifically account transactions and payment orders, can be automated if desired.
The following actions are performed as part of the automatic broadcast:
- Updating bank data and retrieving new transactions
- Updating of open "payment" records
- Automatic generation of target records from "template" records
The exact timing of the update of bank data and the retrieval of new transactions is controlled by the "Frequency", "Start Hour" and "End Hour" fields in the configuration data set. Please refer to the special notes in section "2.3 Creating a configuration data set" of the documentation.
The frequency at which bank data can be updated and new transactions retrieved depends on the linked banks.
NOTE: Basically, the retrieval can be done in intervals up to one hour. However, most banks require a strong authentication via a second factor for more than 4 automatic retrievals per day!
These and other settings can be made in the "Configuration" record.
The updating of open "Payment" records is basically done hourly - but only if there are also open "Payment" records in the system.
Automatic generation of target data records from order templates takes place once a day at 0 o'clock.
Activate the automatic broadcast call via the "Toggle Schedule" button.
 X
X
The "Scheduled" checkbox indicates whether the broadcast call has already been activated.
NOTE: If activation has already taken place, clicking the "Toggle Schedule" button again will deactivate the broadcast call.
4. Reporting
A key feature of Millio is that you can monitor all account transactions, filter them by any parameter in reports and visually map them in dashboards.
Use the well-known integrated Salesforce tools "Reports" and "Dashboards" for this.
The following "Report Types" are available at Millio with installation:
| Report Type | Description |
|---|---|
| Direct Debits | Enables general reports on direct debits. |
| Direct Debits with Payment | Enables reports on direct debits that have already been assigned to a payment record for transmission to the bank. |
| Money Transfers | Enables general reports on outgoing payments. |
| Money Transfers with Payment | Enables reports on money transfers that have already been assigned to a payment record for transmission to the bank. |
| Transactions | Enables reports on incoming transactions. |
With the usual Salesforce tools, dashboards can also be created from all the reports created.
 X
X
5. Error handling
The more diverse the functionality of a system, the more complex the configuration. Errors happen in the process. A central focus of Millio is to provide users with the best possible support in analyzing configuration errors that occur and to avoid input errors directly.
5.1. Data entry errors
In the event of errors due to incorrect entries or connection problems, the user receives a corresponding message.
 X
X
If no indication of an error is output, it can generally be assumed that the triggered action was successful.
Some of the error messages displayed originate from connected third-party systems (e.g. finAPI), the Millio application (e.g. through validations during data entry) or Salesforce itself.
If an error message is unclear, we recommend consulting the Salesforce administrator responsible for the installation. If even he can't help, just contact us via email at support@millio.com and send us a screenshot of the error message so that we can help you directly.
5.2. Errors during actions performed in the background
For a better overview, a large part of the actions performed in the background (for example, the connection with the bank server) is stored in a "Result" object set up for this purpose. This enables the traceability of actions performed in the background or automatically.
 X
X
A list of these result records can be found in the "Results" tab. In case of success, the "Success" message is displayed. In case of error, the corresponding error.
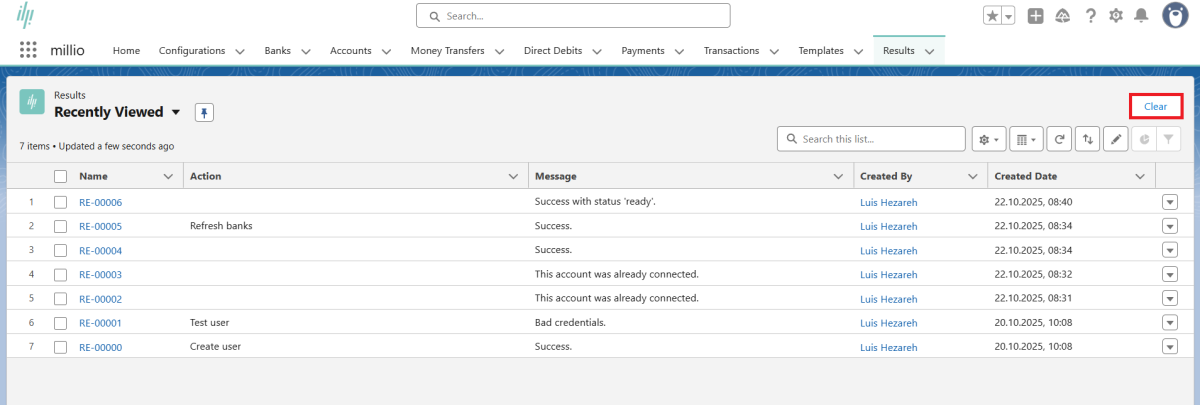
NOTE ON THE RELEASE OF STORAGE SPACE
To free up memory that has been consumed over time by accumulated "Result" records, the "Clear Results" button can be used in any list view of the "Results" tab. Please note that using this button will always clear all "Result" records regardless of the currently displayed list view!
 X
X
5.3. Transaction assignment error
Errors in the assignment of incoming account transactions to Salesforce data records are displayed in a "Mapping Result" object provided for this purpose at the transaction level. If an incoming account transaction cannot be mapped, the respective cause can be determined here.
 X
X
The error messages issued as part of "Mapping Errors" can be configured within the "Mapping" record that triggered the mapping attempt.
In some cases, the system also allows sending an error email to the email address stored in the configuration ("Error Email Address" in the configuration object).
6. Glossar
API
API stands for "Application Programming Interface". It is a programming interface through which the application exchanges and interacts with third-party applications.
App Launcher
The App Launcher allows users to switch between different applications. The App Launcher displays tiles associated with available Salesforce apps, connected apps (third-party apps), and the user's local apps.
Dashboard
Dashboards are visualizations of data that have been determined using Salesforce Reports. They are visualized by means of diagrams in a wide variety of forms.
Mapping
Refers to the assignment of incoming transactions to Salesforce records according to specific criteria.
finAPI
finAPI is a German service provider for addressing your own bank account via programming interfaces. finAPI is BaFin-licensed and ensures maximum data security.
Object
Record types within the Salesforce database. Examples of standard objects already created in Salesforce are accounts, contacts and opportunities. In addition to the standard objects that exist in Salesforce, any custom objects can be configured in Salesforce.
Permission Set
A collection of permissions to extend the access rights of users granted at profile level.
Reports
Reports are based on Salesforce objects and are, roughly speaking, lists of records that meet specified criteria.
(Strong) Authentification
If you are a customer of a bank and are asked to identify yourself again, you will be prompted to use a two-factor authentication. Usually in the form of an additional TAN entry.